When it comes to enjoying a great cup of coffee, the cleanliness of your aluminum coffee percolator plays a pivotal role. Not only does it ensure your coffee tastes fresh and delicious, but it also extends the lifespan of your beloved coffee maker. In this guide, we’ll delve into the nitty-gritty of how to clean your aluminum coffee percolator effectively, ensuring every brew is as enjoyable as the first.
Key Takeaways
- Non-Abrasive Tools Are a Must: To maintain the pristine condition of your aluminum coffee percolator, always opt for soft, non-abrasive cleaning tools. Using harsh scrubbers can scratch the surface, which could lead to corrosion or other damages.
- Diverse Cleaning Methods: There’s more than one way to clean a percolator. Whether you choose baking soda, vinegar, or even denture cleaning balls, each method has its unique benefits. Find the one that suits your needs and ensures your percolator remains spotless.
- Regular Cleaning Prevents Corrosion: Aluminum is prone to corrosion if not cared for properly. Regular cleaning not only keeps your coffee tasting great but also prevents the buildup of harmful residues that can lead to corrosion.
- Safety First During Cleaning: Safety should never be an afterthought. When cleaning your percolator, ensure it’s unplugged and cool to touch. And remember, never immerse an electric percolator in water to avoid any electrical hazards.
Detailed Cleaning Instructions
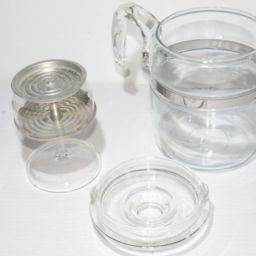
Getting Started: Before diving into the cleaning process, gather all the necessary supplies: baking soda, white vinegar, a soft cloth or sponge, hot water, and optional denture cleaning balls. Start by disassembling your percolator, separating the basket, spreader, and other removable parts.
The Baking Soda Method: For a gentle yet effective clean, baking soda is your go-to. Sprinkle a generous amount of baking soda on a damp cloth and scrub the interior and exterior of your percolator. Focus on areas with visible stains or buildup. Rinse thoroughly with hot water to eliminate any residue. This method is not only effective but also safe, ensuring no scratches or damage to your percolator.
Vinegar for Deep Cleaning: White vinegar is a powerful cleaning agent, perfect for descaling and removing stubborn stains. Mix equal parts of vinegar and hot water, fill your percolator, and let it soak for about 30 minutes. For a deeper clean, you can run the percolator with this vinegar solution. Afterward, rinse it well with hot water to remove any lingering vinegar smell.
Denture Cleaning Balls: If you’re looking for an unconventional yet effective method, try denture cleaning balls. Fill the percolator with hot water, drop in a couple of denture cleaning balls, and let the solution work its magic. This method is particularly good for removing stubborn coffee stains and leaving your percolator sparkling clean.
Cleaning Hard-to-Reach Areas: Don’t overlook the small nooks and crannies of your percolator. Use a soft-bristled toothbrush or a similar non-abrasive tool to scrub the basket and any other challenging spots. This ensures that you’re not just cleaning the surface but maintaining the overall hygiene of your percolator.
Rinsing and Drying: After you’ve applied your chosen cleaning method, it’s crucial to rinse the percolator thoroughly with hot water. Ensure that all cleaning residues are completely washed away. After rinsing, dry the percolator with a soft cloth or allow it to air dry. This step is vital to prevent any water spots or corrosion.
Reassembly and Post-Cleaning Brew: Once your percolator is dry, reassemble all the parts. To ensure that any residual cleaning solution is removed, run a brewing cycle with just water before making your next batch of coffee. This not only cleans any remaining residues but also ensures that your first post-cleaning brew is as fresh and clean as possible.
Regular Maintenance: To extend the lifespan of your percolator and ensure consistently great-tasting coffee, make cleaning a regular part of your routine. A simple rinse after each use and a deep clean every few weeks can make a significant difference in the performance and longevity of your coffee maker.
Comparison of Cleaning Agents
When it comes to keeping your aluminum coffee percolator sparkling, not all cleaning agents are created equal. Here’s a quick breakdown to help you choose the right one:
- Vinegar:
Pros: Readily available, eco-friendly, and great for descaling.
Cons: Can leave a lingering odor if not rinsed properly. - Baking Soda:
Pros: Gentle on surfaces, effective at removing odors and light stains.
Cons: May require more elbow grease for tough stains. - Denture Cleaning Tablets:
Pros: Easy to use and surprisingly effective at removing coffee residues.
Cons: Not a common household item, so you might need to make a special purchase. - Lemon Juice:
Pros: Natural, leaves a fresh scent, and good for light cleaning.
Cons: May not be as effective for heavy-duty cleaning tasks.
Expert Advice: Experts in coffee preparation stress the importance of a clean percolator for the best brew. Here’s a nugget of wisdom: “Regular cleaning isn’t just about hygiene; it’s about preserving the true flavor of your coffee. Even slight residues can alter the taste.”
User Testimonials
Hearing from fellow coffee enthusiasts can be incredibly insightful. One user shared, “After switching to a baking soda and water mix for cleaning, I noticed a significant improvement in my coffee’s taste. It’s like I’m using a brand new percolator each time!”
Another user mentioned, “Using vinegar was a game-changer for me. Not only did it clean my percolator, but it also seemed to enhance the machine’s efficiency. Plus, I love that it’s an eco-friendly option.”
Accessory Recommendations
Enhancing your coffee percolator cleaning routine can be as simple as using the right tools. Here are some accessories to consider:
- Non-Abrasive Sponges or Cloths: Ideal for wiping down your percolator without scratching the surface.
- Soft-Bristled Brushes: Perfect for reaching into the nooks and crannies of the percolator, ensuring a thorough clean.
- Eco-Friendly Cleaning Solutions: Opt for biodegradable and non-toxic cleaners for an environmentally conscious choice.
- Descaling Agents: If you have hard water, a descaling solution can help remove mineral build-up, enhancing your percolator’s performance.
Signs of Wear and When to Replace
While regular maintenance can extend the life of your percolator, there are signs to watch for that indicate it might be time for a replacement:
- Persistent Off Tastes: If cleaning doesn’t remove strange flavors from your brew, the percolator may be beyond repair.
- Corrosion or Rust: Aluminum is resistant to rust, but if you notice any corrosion, especially in the brewing area, it’s time for a new one.
- Leaking: A percolator that leaks water or coffee is a sign of a compromised structure, signaling the need for a replacement.
- Inefficiency in Brewing: If your percolator takes much longer to brew than it used to, despite thorough cleaning, it might be time to consider a new model.
FAQs
How do you clean a tarnished aluminum coffee pot?
Tackling tarnish on your aluminum pot is straightforward. A simple mixture of lemon juice and water can work wonders. Apply the mixture to the tarnished areas, let it sit for a few minutes, then scrub gently with a soft sponge. Rinse thoroughly afterward.
Can you use vinegar to clean a percolator?
Absolutely! Vinegar is a fantastic cleaning agent for percolators. Mix equal parts water and white vinegar, run it through a brewing cycle, then follow up with a few cycles of plain water to rinse out any lingering vinegar taste.
What about cleaning oxidized aluminum?
For oxidized aluminum, a paste made from baking soda and water is effective. Apply it to the affected areas, allow it to sit for a bit, then scrub gently and rinse. It’s a safe and natural way to bring back the shine.
What are the best cleaners for aluminum pots?
Besides vinegar and baking soda, cream of tartar or a mild detergent can also be effective. The key is avoiding harsh chemicals or abrasive materials that can damage the aluminum surface.
How often should you clean your percolator?
It’s best to rinse your percolator after each use and aim for a deep clean every few weeks, depending on your usage. Regular maintenance prevents build-up and ensures your coffee always tastes fresh.
Dealing with coffee grounds build-up or stains?
For stubborn stains or grounds build-up, a soaking session with vinegar or baking soda solution can be helpful. Let it sit for 30 minutes to an hour, then scrub gently and rinse.
Final Thoughts
Regular and proper cleaning of your aluminum coffee percolator isn’t just about hygiene; it’s about ensuring every cup of coffee is as delicious as the last. By following the straightforward tips and methods outlined, you’ll not only extend the life of your percolator but also enhance your coffee experience.