Pour-over coffee is renowned for its ability to bring out complex flavors and aromas from coffee beans, offering a hands-on approach to your morning ritual. This article will guide you through the joys and practicalities of creating your own pour-over coffee maker, ensuring that your next cup of coffee is as rewarding to make as it is to drink.
Key Takeaways
- Personal Touch: Crafting your pour-over coffee maker adds a personal touch to your coffee routine, making each cup more special.
- Material Variety: Whether you prefer wood, copper, or even simple pipe materials, there’s a DIY option to suit your style and skill level.
- Enhanced Experience: Engaging in the process of making your coffee maker and using it to brew your coffee can deepen your appreciation for this beloved beverage, turning your morning cup into a meaningful ritual.
Understanding Pour Over Coffee
Pour-over coffee isn’t just a brewing method; it’s a ritual that coffee aficionados swear by. At its core, pour-over coffee involves pouring hot water over coffee grounds, allowing the water to flow through the coffee and a filter, and then directly into a cup or carafe. This method is celebrated for its precision and ability to extract a cup of coffee that’s full of flavor and aroma.
Unlike the quick brew of a standard coffee machine or the rich, heavy body of a French press, pour-over coffee stands out for its clarity and complexity of flavors. It’s like the difference between a fast-food meal and a dish prepared by a gourmet chef. The pour-over method gives you control over every variable – the temperature of the water, the speed of the pour, the grind of the beans – allowing you to tailor your coffee to your exact preferences.
The rise in popularity of pour-over coffee can be attributed to its simplicity and the personal satisfaction it provides. There’s something genuinely gratifying about handcrafting your cup, controlling the process from start to finish, and then savoring the result of your efforts. It’s not just about the caffeine kick; it’s about engaging in a mindful, enjoyable experience that starts your day on a high note.
Essential Tools and Materials
Embarking on the journey of creating your own DIY pour-over coffee maker begins with understanding the tools and materials you’ll need. At its heart, pour-over coffee making is beautifully simple, yet the right tools can elevate your brew to new heights.
Coffee Filters: The unsung heroes of the pour-over process, these filters keep grounds out of your cup, ensuring a clean, sediment-free brew. Whether paper or metal, each filter type impacts the coffee’s flavor profile.
Kettles: A gooseneck kettle offers precision pouring, allowing you to control the water flow and distribution over the coffee grounds. This control is crucial for even extraction, a cornerstone of pour-over excellence.
Scales: Precision matters in pour-over brewing. A scale ensures the right coffee-to-water ratio, vital for that perfect cup.
Grinders: Freshly ground coffee is non-negotiable for a top-tier brew. A burr grinder provides consistent grind sizes, critical for even extraction.
Materials: The choice of materials—wood, copper, or pipe—adds a personal touch to your coffee maker. Each material not only influences the aesthetics but also the user’s connection to the brewing process.
Wood-Based Coffee Maker
Creating a wood-based pour-over coffee maker adds a touch of nature to your morning routine. Start by selecting a durable, non-toxic wood. Cut it to your desired size and shape, ensuring it supports your filter and carafe or cup. Sand the wood to a smooth finish, apply a food-safe sealant, and voila, you’ve crafted a rustic, personalized coffee stand that brings warmth and individuality to your brew.
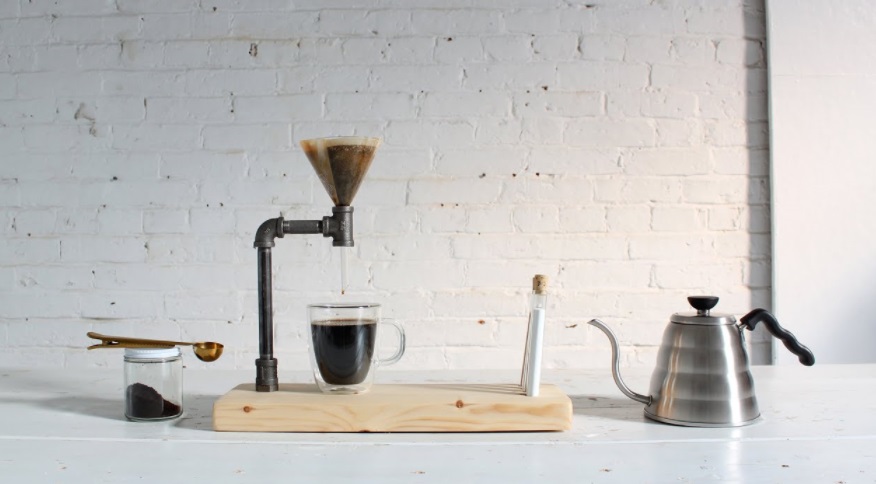
Pipe Coffee Maker
Creating a pour-over coffee maker from pipes is a unique project that blends functionality with industrial chic aesthetics. You’ll need various pipe pieces, like elbows and T-fittings, to assemble the structure. The process involves connecting these pieces to form a stable base and an arm to hold your coffee filter.
It’s a straightforward construction that requires minimal tools, and the result is a durable and stylish coffee maker that can be a real conversation starter in your kitchen.
Copper Pipe Coffee Maker
Crafting a pour-over coffee maker from copper pipes adds elegance and a touch of vintage charm to your brewing ritual. For this DIY project, you’ll cut copper pipes into specific lengths to create a stand that holds your coffee filter and vessel. Fittings like elbows and T-joints help connect the pieces. Once assembled, the copper’s natural sheen adds a warm, inviting glow to your coffee routine. It’s not just about making coffee; it’s about creating a piece of art that serves a functional purpose.
Step-by-Step Guide to Making Your Coffee Maker
Creating your own pour-over coffee maker is a fulfilling project that combines craftsmanship with the love of coffee. Here’s a concise, step-by-step guide to help you brew your DIY ambitions into reality.
- Design Planning: Start by sketching your design based on the material you’ve chosen. Whether it’s wood, pipe, or copper, the design should include a base, a stand, and a holder for the coffee filter.
- Gathering Materials: Collect all necessary materials and tools before you start. This includes your chosen material (wood planks, pipes, or copper tubing), tools for cutting and shaping, and necessary connectors or sealants.
- Cutting to Size: Using your design as a guide, cut your material to the required lengths. For wood, this might mean sawing planks to create a base and stand. For pipes or copper, this involves cutting tubing to size.
- Assembling the Base: For a stable coffee maker, a solid base is essential. If you’re using wood, ensure the base is flat and wide enough to support the structure. For pipe or copper, assemble the base using fittings to connect pieces securely.
- Creating the Stand: The stand should be tall enough to accommodate your coffee cup or carafe. Ensure it’s attached firmly to the base. For added stability, consider a design that allows the stand to be anchored.
- Attaching the Filter Holder: This is where your coffee filter will rest. The holder can be a simple ring for wood or a fitted section for pipes and copper. Ensure it’s positioned at the correct height for your brewing vessel.
- Finishing Touches: Sand any rough edges (for wood) or clean and polish (for pipe and copper) to give your coffee maker a professional finish. If using wood, apply a non-toxic sealant for durability.
- Testing: Before using your new coffee maker, test it with water to ensure stability and functionality. Adjust any components as necessary to ensure your coffee will brew correctly.
- Brewing Your First Cup: Once you’re satisfied with the construction, it’s time to enjoy the fruits of your labor. Set up your pour-over coffee maker, place your filter, add coffee grounds, and pour hot water. Enjoy the unique taste of coffee brewed from a maker you created.
Preparing the Materials
Before diving into the build, take the time to carefully measure and cut your chosen material. Whether it’s wood, pipe, or copper, accuracy is key. Measure twice, cut once! For wood, ensure a smooth, flat surface for stability. For pipes and copper, clean and deburr the edges for a neat assembly. This foundational step sets the stage for a successful build, ensuring that all pieces align correctly during assembly.
Assembly Process
Begin by laying out all your pieces according to your design plan. If you’re working with wood, join the base to the stand using screws or glue. For pipes or copper, connect the pieces using appropriate fittings. Ensure everything is tight and secure. When attaching the filter holder, check its height and stability; it needs to support the weight of the coffee and water without tipping.
Step back, assess, and adjust as needed to ensure your coffee maker is balanced and aesthetically pleasing.
Finishing Touches
Now, focus on the details. For wooden makers, sand any rough edges and apply a food-safe finish to protect the wood. If you’re using metal, give all surfaces a final clean and polish to bring out the shine. Finally, set up your coffee maker and run a water test to check for any leaks or imbalances. Once you’re happy with the result, it’s time to brew your first cup and enjoy the satisfaction of having created something functional and beautiful with your own hands.
Brewing Your First Cup
Now that you’ve crafted your DIY pour-over coffee maker, it’s time to brew your first cup. Begin by placing a filter in the holder and rinsing it with hot water to remove any paper taste and warm the vessel. Discard the rinse water. Add your ground coffee—aim for a medium-fine grind, akin to sea salt. Slowly pour hot water (around 200°F) over the grounds, starting at the center and spiraling out, ensuring all grounds are saturated.
Pour slowly and steadily, maintaining a consistent flow. Watch as your coffee drips into the cup below, releasing its full spectrum of flavors and aromas.
FAQs
How do I maintain my DIY pour-over coffee maker? Regular cleaning is essential. For wood, wipe with a damp cloth; for metals, use soapy water but dry immediately to avoid rust.
Can I customize my coffee maker? Absolutely! Paint, stain, or add unique design elements to make your coffee maker truly one-of-a-kind.
What if my coffee tastes off? Experiment with grind size, water temperature, and pouring technique. Coffee brewing is an art—adjusting these variables can dramatically change the taste.
Final Thoughts
Creating your own pour-over coffee maker is more than a DIY project; it’s a journey into the heart of coffee culture. You’ve not only built a functional device but also a personalized tool that reflects your passion for coffee. This journey doesn’t end with the last screw tightened or the final piece polished. Each brew is a new opportunity to refine your technique, explore flavors, and enjoy the fruits of your labor. So, take pride in your creation, share it with friends, and let every cup you brew be a testament to your dedication and craft.