Milk frothing transforms your coffee experience by adding a velvety, rich layer to your favorite beverages. It’s all about incorporating air into milk to create that luxurious, creamy foam that sits atop lattes and cappuccinos. Understanding the basics of milk frothing is crucial for anyone looking to enhance the texture and flavor of their coffee drinks.
Key Takeaways about Milk Frothing for Beginners
- The Importance of Temperature and Equipment: Starting with cold milk and even a chilled pitcher can make a significant difference. Cold milk froths better because it allows more time for air to be incorporated before it reaches the optimal temperature for sweetness and texture.
- Mastering the Steam Wand:Positioning and temperature control are critical when using a steam wand. The wand should be introduced just below the milk’s surface to create fine, micro-foam without large bubbles. The ideal temperature for milk frothing is around 140-155°F (60-68°C), where milk develops a sweet flavor and creamy consistency.
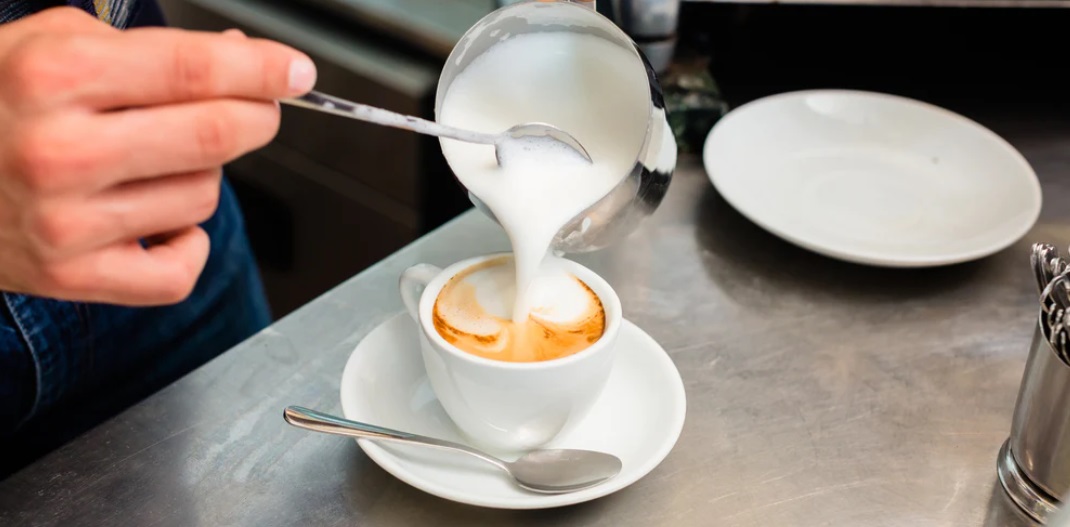
- Pouring Like a Pro:Handling and pouring frothed milk requires a gentle touch to maintain its texture. When creating latte art, pour steadily and with precision to achieve beautiful designs on the surface of your coffee.
- Regular Maintenance: Clean and Functional: Regularly cleaning your frothing equipment ensures consistent performance and hygiene. A clean steam wand won’t impart old flavors to your fresh froth.
- Frothing Non-Dairy Milk: Frothing isn’t limited to dairy. Non-dairy milks like almond, soy, and oat can also be frothed, though each may require different techniques due to varying protein and fat contents. Typically, soy milk froths the best among plant-based options due to its protein content which is closer to cow’s milk.
Basic Equipment and Setup
Starting with the right tools is crucial when you’re new to milk frothing. The essentials include a good-quality steam wand, typically attached to an espresso machine, or a standalone milk frother. These can be automatic, handheld, or manual, like a French press.
- Steam Wands: Most espresso machines come with a built-in steam wand, which is great for creating microfoam. This tool requires some practice but offers the most control over the frothing process.
- Electric Frothers: These devices are easy to use and perfect for beginners. They heat and froth the milk with the push of a button.
- Manual Frothers: Like a French press, these require you to manually pump the milk to create froth. They’re more labor-intensive but inexpensive and simple to use.
Step-by-Step Milk Frothing Process
Frothing milk is both an art and a science. Here’s a detailed guide to help you master this skill using a steam wand:
- Preparation: Start with fresh, cold milk filled to about one-third of a metal pitcher. Cold milk froths better because it gives you more time to work air into it before it heats up.
- Purge the Wand: Before steaming, always purge your steam wand to remove any water residue that might dilute your milk.
- Positioning the Wand: Submerge the tip of the steam wand just below the surface of the milk at a slight angle. This helps create a whirlpool effect, which is key to smooth froth.
- Introduce Air: For the first few seconds, keep the tip near the surface to introduce air into the milk. You’ll hear a distinct hissing sound. As the milk froths, lower the wand gradually to incorporate the air throughout the milk.
- Heat to the Right Temperature: Continue steaming until the milk’s temperature reaches around 150°F. Use a thermometer or learn to judge the temperature by feeling the pitcher (it should be hot to the touch but not so hot that you can’t hold it).
- Swirl and Tap: Once done, remove the pitcher and swirl the milk to break any large bubbles. Tap it gently on the counter to remove more bubbles and make the texture even creamier.
- Clean the Wand: Always clean the steam wand immediately after use by wiping it down and purging steam to expel any milk trapped in the nozzle.
Adjusting Milk Temperature for Optimal Froth
Achieving the perfect froth isn’t just about technique; it also heavily depends on the milk’s temperature. The ideal temperature for frothing milk is between 140°F and 155°F. At this range, milk develops a sweet flavor and a creamy, velvety texture that’s just right for coffee drinks.
- Sweet Spot for Sweetness: Milk heated to around 150°F is at its sweetest. Heating beyond this point can lead to a burnt flavor, reducing the natural sweetness that enhances your coffee.
- Monitoring Temperature: Using a thermometer is the best way to ensure accuracy. However, with practice, you can learn to judge the temperature based on touch. The pitcher should be hot to the touch, but not so hot that you can’t hold it for a few seconds.
Techniques for Better Froth Control
Controlling the size and texture of your froth can transform a simple coffee into a special treat. Here are some advanced techniques to help you refine your froth:
- Correct Positioning of the Steam Wand: Place the wand just below the surface at the beginning to introduce air, then lower it to mix air throughout the milk. This helps in creating evenly sized, fine bubbles.
- The Whirlpool Method: By angling the steam wand slightly, you can create a whirlpool effect in the milk. This technique not only helps in evenly distributing heat but also in achieving a silky, smooth microfoam.
- Tap and Swirl: After steaming, tap the pitcher on the counter to remove any large bubbles. Swirling the milk helps in mixing the froth uniformly through the liquid, enhancing the texture.
- Regulate Air Intake: The amount of air you introduce while frothing affects the texture. For a creamier froth, introduce air slowly and steadily; for a lighter, airy froth, introduce more air quickly.
- Use of Tools: Some baristas use a small spatula or a thermometer probe to stir the milk during the frothing process. This can help break down any larger bubbles and integrate the froth more evenly.
Tips for Creating Latte Art
Creating latte art is a skill that enhances the visual appeal of your coffee and showcases your mastery of milk frothing. Here’s how to pour frothed milk for latte art effectively:
Start with the Right Angle: Begin by tilting the cup at about 45 degrees while you start pouring the milk. This helps in layering the froth on top of the espresso smoothly.
Control the Pour: Start pouring from a height to integrate the milk into the espresso without breaking its crema. As the cup fills, gradually bring the pitcher closer to the surface.
Speed and Flow: The flow rate of your pour affects the design. Start with a slow pour to stabilize the milk in the cup, then increase the flow to create your design.
Basic Designs: Start with simple designs like a heart or a rosetta. These are created by moving the pitcher through the milk in specific patterns—like a swift strike through the center for a heart, or a gentle wiggle from side to side for a rosetta.
Frothing Non-Dairy Milks
Non-dairy milks froth differently than cow’s milk due to variations in protein and fat content. Here’s how to approach some popular options:
Almond Milk: It creates a lighter, airier froth. For best results, use barista-specific almond milk, which is formulated to froth better.
Soy Milk: This is a favorite for frothing among non-dairy milks because it has a protein content similar to cow’s milk, which helps in creating stable, creamy foam.
Technique Adjustments: You may need to froth non-dairy milks slightly longer or at a higher temperature. Experiment with your frother settings to find what works best for each type of milk.
Understanding the properties of each type of milk will help you achieve the best froth and make your dairy-free coffee drinks just as delightful.
Cleaning and Maintenance of Frothing Equipment
Regular cleaning is essential to maintain the functionality and hygiene of your frothing equipment:
Post-Use Cleaning: Always clean the steam wand immediately after use. Wipe it down with a damp cloth to remove milk residue and purge steam to clear out any milk inside the wand.
Deep Cleaning: Periodically, it’s important to perform a deeper clean. Soak the wand and any removable parts in a mixture of warm water and detergent to dissolve any buildup.
Regular Checks: Inspect your equipment for signs of wear or clogging. Keeping your frother in top shape ensures that it operates efficiently and continues to produce perfect froth every time.
FAQs
Can I Froth Milk Without a Frother?
Yes, you can! Use a whisk or shake the milk in a tightly sealed jar, then heat it up for a quick DIY froth. These methods won’t be as fine as with a frother but are great in a pinch.
How Long Can I Store Frothed Milk?
Frothed milk should be used immediately. If you must store it, keep it in the fridge for up to 24 hours in a sealed container, though it may lose some texture.
What Type of Milk is Best for Latte Art?
Whole milk is often preferred for latte art due to its balanced fat and protein content, which makes stable, smooth foam. However, barista blends of almond or soy milk can also perform well.
Tips for Troubleshooting Common Milk Frothing Issues
- If your milk isn’t frothing, ensure it’s fresh and cold.
- Avoid overfilling the pitcher.
- Clean the steam wand thoroughly as a clogged wand can hinder performance.
Final Thoughts
Mastering the art of milk frothing can transform your home coffee experience, bringing a touch of café luxury to your daily routine. Whether you’re working with a high-end espresso machine or just a simple hand frother, the key lies in using the right techniques and maintaining your equipment.