Home coffee roasting is an increasingly popular practice among coffee enthusiasts seeking to enhance their coffee experience. This method allows individuals to control the roast level of their beans, tailoring the flavor to their precise liking. Roasting coffee at home is not only cost-effective but also offers a fresher and more satisfying taste compared to store-bought options.
The process involves heating green coffee beans until they reach the desired roast. It requires attention to detail, as the beans undergo significant physical and chemical changes. The transformation from green, unroasted beans to aromatic, roasted coffee is both an art and a science.
The importance of home roasting cannot be overstated. It provides a deeper connection to the coffee-making process, allowing for a customized brew that caters to individual preferences. Moreover, home roasters can explore different coffee origins and varieties, expanding their coffee knowledge and palate.
Preparing for Roasting
Equipment and Ingredients
Before beginning the roasting process, it’s essential to gather the necessary equipment and ingredients. You will need:
- Raw coffee beans of your choice.
- An oven capable of reaching the required temperatures for roasting.
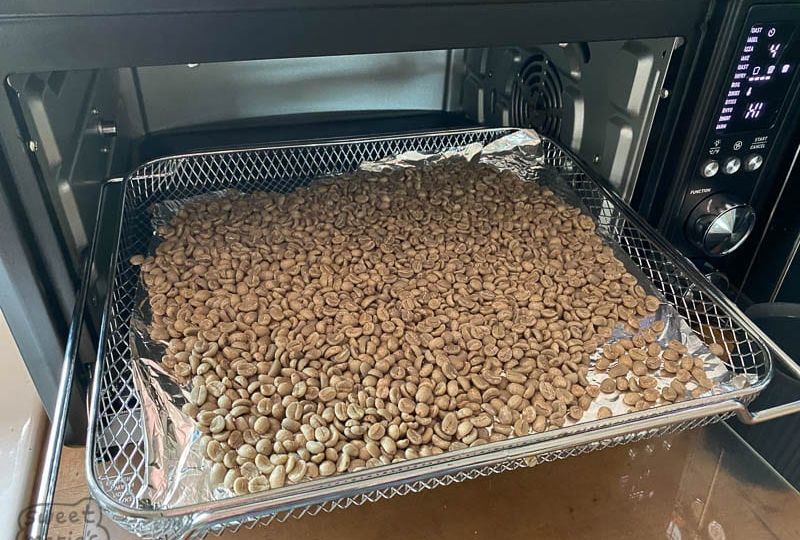
- A baking sheet, preferably covered with aluminum foil to aid in even roasting and easy cleanup.
- Oven mitts to handle hot equipment.
- A strainer or wooden spoon for stirring and cooling the beans.
Preparing your oven and baking sheet is crucial. Preheat your oven to the recommended temperature range for coffee roasting, typically between 450°F to 500°F. Cover your baking sheet with aluminum foil and spread the beans in a single layer, ensuring they are not overcrowded to promote even roasting.
Understanding Roast Levels
The roast level of coffee beans significantly influences their flavor profile. Roast levels range from light to dark, each offering distinct characteristics:
- Light Roast: Beans are roasted to a light brown color, preserving the unique flavors of their origin. Light roasts have a higher acidity and retain most of
The Roasting Process
Roasting coffee beans in an oven is a meticulous process that transforms the raw, green beans into fragrant, flavorful coffee. This section provides a detailed step-by-step guide to achieve an even and satisfying roast, followed by tips to ensure consistency across batches.
Step-by-Step Guide
Preheat the Oven
Begin by preheating your oven to a temperature range between 450-500°F (232-260°C). This high heat is crucial for the coffee roasting process, enabling the beans to reach the desired roast levels.
Measure and Spread Beans
Measure out a single layer of green coffee beans and spread them evenly on a baking sheet lined with aluminum foil. Ensuring the beans are in one layer is vital for uniform roasting; overcrowding can lead to unevenly roasted beans.
Roasting and Stirring
Place the baking sheet in the middle of the oven to promote even heat distribution. Throughout the roasting process, it’s essential to stir the beans occasionally. This practice prevents the beans from burning and promotes an even roast.
Monitoring the Roast: Color and Cracks
Keep a close eye on the beans as they roast, watching for changes in color and listening for the “first crack,” a popping sound that indicates the beans are expanding and the roasting process is progressing. Depending on your preference, you may continue roasting until the “second crack” for a darker roast. The beans’ color, from green to golden to varying shades of brown, will guide you in determining the roast level.
Cooling and Removing Chaff
After achieving the desired roast level, remove the beans from the oven and cool them quickly to stop the roasting process. Cooling can be facilitated by spreading the beans on a cool surface or using a fan to blow air over them. During the cooling process, remove the chaff, a thin skin that detaches from the bean, to ensure a clean final product.
Tips for Even Roasting
Achieving an even roast is crucial for the best flavor profile. One key tip is to rotate the tray periodically during roasting to ensure all beans are exposed to consistent heat. Additionally, managing airflow is essential; an oven cracked open slightly can help vent smoke and improve air circulation, contributing to a more uniform roast. These practices, combined with the detailed steps above, will help you master the art of oven-roasting coffee beans at home.
Part 2: Post-Roasting Process
Cooling and Storing
After roasting, rapid cooling is essential to halt the roasting process and preserve the beans’ flavor. Spreading the beans on a cool, flat surface or using a fan to blow air over them can effectively reduce their temperature. Once cooled, storing the beans in an airtight container away from light and moisture is crucial. Proper storage ensures the beans’ freshness and flavor are maintained until they are ground and brewed.
Coffee Beans Types and Characteristics
Coffee beans are primarily classified into two types: Arabica and Robusta. Arabica beans are known for their smooth, complex flavor profiles, with varying acidity levels and a hint of sweetness. In contrast, Robusta beans are more robust, with a stronger, more bitter flavor and higher caffeine content. The origin of the beans also significantly influences their flavor, with different regions imparting unique characteristics, such as floral, fruity, or nutty notes.
Customizing Your Roast
Customizing the roast level allows for tailoring the flavor to personal preferences. Light roasts preserve the bean’s original flavors with higher acidity, while dark roasts offer a fuller body with a more pronounced bitterness. Experimenting with bean blends can create unique flavor profiles, combining the qualities of different origins and roast levels for a personalized coffee experience.
Common Mistakes and How to Avoid Them
Common roasting mistakes include overloading the oven tray, under-stirring the beans, and insufficient ventilation. These can lead to uneven roasting and undesirable flavors. Ensuring the beans are spread in a single layer, stirred frequently, and roasted in a well-ventilated oven can mitigate these issues. Additionally, using clean equipment for each roast prevents the accumulation of oils and residues, ensuring the true flavor of the coffee shines through.
FAQs
How long to roast?
The roasting time varies depending on the desired roast level and oven temperature, typically ranging from 10 to 20 minutes. Light roasts may take shorter, around 10 minutes, while dark roasts can extend up to 20 minutes.
Can any coffee bean be roasted?
Yes, all green coffee beans can be roasted. However, the bean’s origin, variety, and processing method will influence the flavor profile of the roasted coffee.
Determining roast levels
Roast levels are determined by the bean’s color and the occurrence of “cracks.” Light roasts are achieved before the second crack, medium roasts around the start of the second crack, and dark roasts after it.
Dealing with the chaff
Chaff, the thin skin that comes off the beans during roasting, should be removed post-roast during the cooling process. It can be separated easily with a colander or by blowing gently on the beans.
Best practices for storage and degassing
Store roasted beans in an airtight container at room temperature, away from direct sunlight and moisture. Allow the beans to degas for 12 to 24 hours before sealing to release excess carbon dioxide.
Conclusion
Roasting coffee beans in the oven is a rewarding process that enhances the coffee experience, offering a fresh, customized brew. While it requires attention to detail and patience, the result is a superior cup of coffee that reflects personal taste preferences.
Experimentation with different beans, blends, and roast levels can lead to discovering unique flavor profiles. Embrace the journey of home roasting, and enjoy the rich, satisfying reward of your labor.


