Learning how to use a stovetop coffee maker, or a Moka Pot, is your ticket to enjoying rich, espresso-like coffee right from the comfort of your home. This beloved brewing method, celebrated for its simplicity and the delicious coffee it produces, has been a staple in Italian homes and is gaining popularity worldwide.
The Moka Pot’s unique design and brewing technique make it distinctive, offering a hands-on approach to coffee that many coffee lovers cherish. Whether you’re a seasoned barista or a coffee enthusiast looking to expand your brewing repertoire, mastering the stovetop coffee maker can elevate your home coffee experience significantly.
Key Takeaways
- Use Fresh, Quality Beans for the Best Flavor: The secret to a superb cup of coffee begins with the beans. Freshly ground coffee beans can make a world of difference in the flavor and aroma of your coffee. Opting for quality beans and grinding them just before brewing ensures that you capture all the essence and oils that contribute to the coffee’s taste.
- Importance of Water Level and Safety Valve: When filling your Moka Pot, pay close attention to the water level in the bottom chamber. It should be just below the safety valve. This is not just a suggestion but a crucial step to ensure the safety and effectiveness of your coffee brewing process.
- Grinding Coffee to the Right Coarseness: The grind size matters significantly when brewing with a Moka Pot. Aim for a medium to fine grind—too coarse, and you’ll get a weak coffee; too fine, and you risk clogging the filter. Finding that sweet spot is key to extracting the full flavor of your beans.
- Quick Brewing Process: A typical brewing session with a stovetop coffee maker takes about 5 minutes. It’s essential to stay vigilant during this time to prevent the coffee from burning, which could spoil the rich flavors you’re aiming for. This quick brewing method means you won’t have to wait long to enjoy your delicious coffee.
- Cleaning and Maintaining Your Moka Pot: To ensure your stovetop coffee maker continues to produce the best coffee, regular cleaning and maintenance are vital. After each use, disassemble your Moka Pot for a thorough cleaning to prevent coffee oil build-up, which can affect future brews. A well-maintained Moka Pot is the foundation of consistently great coffee.
Stovetop Coffee Maker
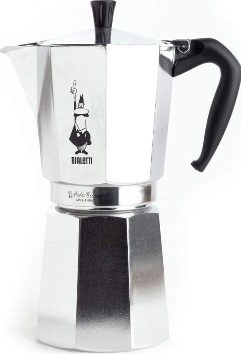
Before diving into the brewing process, let’s break down the stovetop coffee maker, also known as a Moka Pot. This nifty device comprises three main parts: the water chamber, filter basket, and coffee chamber. It’s designed to brew coffee by passing boiling water pressurized by steam through ground coffee, resulting in a coffee that’s as rich and bold as espresso.
The capacity and sizing of Moka Pots are usually expressed in terms of espresso cups, not standard cups. This can range from single servings to larger pots designed to serve multiple cups. It’s crucial to understand this distinction to ensure you’re brewing the right amount of coffee for your needs.
Preparing Your Coffee Maker
Before each use, take a moment to disassemble your Moka Pot. This step is crucial for checking the silicone seal and other parts for any wear or damage. Ensuring the seal is intact is vital for both safety and the quality of your brew. A damaged seal can affect the pressure during brewing, leading to a less than stellar cup of coffee.
The Role of Water: Filling the bottom chamber with filtered water just below the safety valve is a critical step. This valve is a safety feature designed to prevent excessive pressure buildup. Using filtered water can also improve the taste of your coffee, as it’s free from impurities found in tap water.
Coffee Grinding Tips: For the best extraction, your coffee grind should be medium to fine. The grind size is pivotal; too coarse, and you’ll have under-extracted, weak coffee. Too fine, and you risk clogging the filter. Finding that perfect grind size might take a few tries, but it’s worth the effort for the perfect cup.
Brewing Process
Brewing coffee with a stovetop coffee maker is an art that’s both simple and rewarding. Here’s a step-by-step guide to ensure you brew the perfect cup every time:
- Add Water: Start by filling the bottom chamber of your Moka Pot with filtered water up to just below the safety valve. This ensures that your coffee maker operates safely under the right pressure.
- Assemble the Moka Pot: Place the filter basket into the bottom chamber, and fill it with your ground coffee. Avoid pressing down the coffee grounds; just fill it to the top and level it off. Now, screw the top chamber onto the bottom chamber securely.
- Heating: Put the Moka Pot on the stove over low to medium heat. It’s crucial not to use high heat, as this can burn the coffee, affecting its taste and aroma.
- Monitoring the Brew: As the water in the bottom chamber heats up, it creates steam pressure that pushes water through the coffee grounds and into the top chamber. When you hear a gurgling sound or see the coffee flow becoming vigorous, it means your coffee is nearly ready.
- Finishing Up: Once you hear the spluttering sound, remove the Moka Pot from the heat. This sound indicates that the brewing process is complete. To stop the brewing process and prevent over-extraction, you can run the bottom part of the pot under cold tap water.
- Pouring and Serving: Pour the coffee into your cup immediately to enjoy its best flavor. For a smoother experience, avoid pouring the last few drops as they might contain bitter flavors.
Cleaning and Maintenance
Keeping your Moka Pot clean is essential for maintaining the quality of your coffee and ensuring the longevity of the coffee maker.
- After Each Use: Disassemble your Moka Pot and wash each part with warm water. Avoid using soap as it can leave a residue that affects the taste of your coffee. Make sure to clean the filter basket and the rubber gasket thoroughly to remove any coffee oils or grounds.
- Deep Cleaning: Periodically, your Moka Pot may benefit from a deeper clean. You can use a mixture of water and vinegar to help remove any calcification within the water chamber. Rinse thoroughly afterward to ensure no vinegar taste remains.
- Check for Wear: Regularly inspect the rubber gasket and the safety valve for signs of wear or damage. Replacing these parts when needed helps keep your Moka Pot functioning safely and efficiently.
FAQs
What’s the Difference Between Moka Pot Coffee and Espresso?
Moka Pot coffee and espresso share a rich, concentrated flavor profile, but there are key differences. Espresso is made under higher pressure, resulting in a thicker body and crema on top. Moka Pot coffee, while strong, lacks the crema and is slightly less intense.
How Do I Choose the Right Grind Size?
For Moka Pot coffee, aim for a medium to fine grind. Too coarse, and your coffee will be weak; too fine, and it may clog the filter. Experiment to find the grind that produces a strong, flavorful cup without bitterness.
My Coffee Tastes Burnt. What’s Going Wrong?
If your coffee tastes burnt, the heat may be too high. Brew on a lower heat setting to ensure the water heats gradually, extracting flavors without burning the coffee.
The Water Isn’t Flowing Properly. What Should I Do?
Ensure the water level is below the safety valve and the coffee grounds aren’t packed too tightly. Check for any blockages in the filter or funnel and make sure the gasket is sealing properly.
Final Thoughts
Mastering the stovetop coffee maker is an adventure in flavor, tradition, and technique. We’ve covered essential steps from choosing fresh beans, grinding to the right coarseness, and the art of brewing to serving your perfect cup.
The key to great Moka Pot coffee lies in attention to detail and willingness to experiment. Play around with different grinds, quantities, and brewing times to find your ideal balance. The joy of stovetop coffee making is not just in the delicious coffee it produces but also in the satisfaction of honing your craft. Embrace the process, and let each cup be a testament to your evolving skill.


